> For the complete documentation index, see [llms.txt](https://userguide.zappost.com/llms.txt). Markdown versions of documentation pages are available by appending `.md` to page URLs; this page is available as [Markdown](https://userguide.zappost.com/zap-post-web-app/zap-post-user-guide/zap-app/using-the-zapp/design.md).
# Design
The design editor allows you to personalise and edit the layout of your Zaps.
## Accessing the Designer
Once a campaign has been created, the next step is to create a design. \
There are various ways to get to the ZAP-POST designer:\
\- By selecting the ‘design’ icon in the ZAP-POST Nav
\
\- Via the campaigns page
\- Via the View Campaign page design preview
## ZAP-POST Designer
The ZAP-POST designer is a tool that allows you to easily create direct mail designs for specific mail campaigns. With the design tool, you can add images, text, customisations, and QR codes to your Zap designs. \
You can keep your designs on-brand and within your brand guidelines by uploading your own fonts into ZAP-POST. You can also save designs for later; these will be ready to use again whenever they are needed.
When you load a campaign in the designer, you will see a canvas area which matches the paper stock chosen for that campaign.
{% hint style="info" %}
If you need to see what paper stock is configured on your campaign you can download the help pack directly from the designer

{% endhint %}
## Printer's Marks
Depending on the paper stock you have chosen for your campaign, there will be a number of different lines shown on your canvas. Simply put, these lines are quality control methods that help to achieve the professional print and finish your designs deserve.
The visibility of these lines can be turned on/off using the view settings submenu.
There are 3 key printer's marks shown on the Impact, Mini and Secure paper stocks:
1. **Bleed area** - The **red-shaded bleed area** extends out an extra 3mm from the solid black trim line. All images or colour that print to the edge of your design should be fully extended into this area to avoid the chance of white lines appearing. This will ensure that when trimmed, your design is printed edge to edge. Make sure not to place any important content or artwork elements in this area, as it will get trimmed off.
2. **Trim Line** - The **solid black trim line** shows the finished size of the document. Anything placed outside of this area will be trimmed off.
3. **Safety Line** - We recommend that no text or barcodes are placed outside the **red dashed safety line**, as anything placed outside of this box will risk being cut off.
#### Postage and Returns Management Areas
The grey, un-editable boxes shown on the canvas are for the postage and returns management areas. Text and barcode widgets can be placed in these areas but they will become opaque and you'll be presented with a warning. Any images placed in these areas will sit behind a white box outline of the area when printed.
## Assets
Using the asset bar shown below, you can add a number of different assets to your Zap designs. \
ZAP-POST Assets may include the following media types:
* [Static Images](#static-images)
* [Dynamic Images](https://userguide.zappost.com/zap-post-user-guide/zapp/using-the-zapp/design/dynamic-images)
* [Text](#text)
* [Variable Text](#variables)
* [QR Codes](#qr-codes)
* [Custom Fonts](#fonts)
{% hint style="info" %}
You can use the asset explorer on the top right of the designer screen to select, rename, reorder, and delete assets within a campaign's design.
{% endhint %}
#### Duplicating Assets
Assets can be duplicated by either using CTRL C and then CTRL V, or by clicking the duplicate asset icon. This is useful when you might want to preserve the formatting of an asset, rather than starting from scratch on a new asset with default formatting.
### Generic Asset Controls
These controls exists on all assets regardless of their type.
**Arrange** - This will allow you to move the asset up and down layers as well as to the top of bottom layer. \
\
**X Position** - This allows you to define a specific **horizontal** position in mm on the document rather than dragging to place. Upon entry of a value the asset will move to the defined position. \
\
**Y Position** - This allows you to define a specific **vertical** position in mm on the document rather than dragging to place. Upon entry of a value the asset will move to the defined position.
**W (width)** - This allows you to define a specific **width** in mm for the asset. Upon entry of a value the asset will resize accordingly.\
\
**H (height)** - This allows you to define a specific **height** in mm for the asset. Upon entry of a value the asset will resize accordingly.\
\
**ROT (Rotation)** - This allows you to define a specific **rotation** value (in rotation degrees). Upon entry of a value the asset will rotate accordingly.
\
**Rotate Controls** - These rotate buttons allow the user to snap rotate 90 degrees clockwise or anticlockwise depending on the selected button.
**0 degrees button** - This will snap the item back to 0 rotational degrees. \
\
**Scale (%)** - This allows you to define a specific **scale** in % for the asset. Upon entry of a value the asset will resize accordingly.\
\
**Plus and Minus controls** - This will resize the asset up or down 10% depending on the selected control
**1:1 button** - This will resize the asset back to its original size
### Other useful controls
#### Help and Keyboard Shortcuts
To view our simple help guide and keyboard shortcuts click the question mark in the bottom right of the design view.
#### Pan and Zoom
Users can pan and zoom the canvas using the control in the bottom left of the page or by using the keyboard shortcuts available.
Select the hand control to enable 'pan mode' then when you're happy with the canvas position, you can turn pan mode back off. \
\
Keyboard Shortcuts:
**Ctrl + scroll** to zoom in and out.
**Space + mouse drag** to pan the canvas
#### Multi-Select
Users can hold shift when selecting elements to multi select elements on the canvas
These elements can then be moved together or deleted.
#### Dark and Light Mode
Users can swap between light mode and dark in the designer using the control under the username dropdown
{% hint style="info" %}
Light and Dark Mode is available across the entire ZAP APP so the entire app will be styled when this setting is changed however it can be switched at any time from the username dropdown
{% endhint %}
### Static Images
Clicking the static image icon will open the static image window.
Using the static image tool, you can click ‘upload’ to add up to 3 files at once. Accepted formats are jpeg, jpg, png, pdf and tiff. Files can be up to 5MB in size, however, tiff files can be up to 50mb.
These uploaded images are added to your static image library where you can access them at any time.
You can delete any unwanted images from your image library by selecting them and then clicking ‘delete’. You can also create folders in your static image library to organise your images.
To add an image into a Zap design, select it in the static image window then select ‘choose’. When an image has been added to the design, you can use the handles on the sides of the image to resize or rotate the image to your preferred size & position.
{% hint style="info" %}
**Drag & Drop uploads -** drag and drop one or more images into either your static assets folder, or straight onto your canvas when uploading them.
{% endhint %}
### Text
By clicking the text icon, a text box will be added to the centre of a Zap design. \
You can use the handles on the sides of the text box to resize and reposition it.\
\
Select the box to view the text controls in the sidebar. There are two controls worth mentioning here: variables and copy fitting.
#### Variables
This is how you add personalisation to your Zap designs. Select from the dropdown list to choose a personalisation.
When inserted into the design, a placeholder text will appear, this will look similar to ‘<\~D:firstname\~>’. When you upload your recipient data to ZAP-POST, any personalisations will be replaced with the relevant field from your data.
To preview how personalisations will look, you can toggle the preview personalisation to swap out the placeholder example data. By toggling this on you can then cycle through different sets of example data.
#### Date and Time Format
Along with customisation and variables, clients can specify the date and time format that's displayed on their designs.
If the data contains a date or time as a custom field, clients can select from the below.
**Date Formats:**\
Original Formatting\
MM/DD/YYYY - 12/25/2023\
DD/MM/YYYY - 25/12/2023\
Month DD YYYY - December 25 2023\
DD Month YYYY - 25 December 2023\
\
**Time Formats:**\
Original Formatting\
24 Hour - 13:00\
12 Hour - 1:00pm
#### Mailed Date and Mailed Date (Calculated)
**Mailed Date**: This will be replaced with the date the send is mailed. \
\
**Mailed Date Calculated:** This allows you to calculate a date based on the mailing date. This allows you to warn users of expiring offers. \
\
The options to configure the date are: \
\
**+/-:** Allows you to calculate forward and backwards from the Mailed Date\
**Value:** The number you want to alter the Mailed Date by.\
U**nit of time**: The units of time available to be used to alter the Mailed Date are - Days, Weeks, Months and Years.
\
\
This combination allows us to calculate the date that will be shown on the final ZAP.
#### Copy Fitting
This is directly related to Variables. If using a personalisation that potentially has different lengths of data (eg. a first name), copy fitting will ensure that the text will be automatically resized to still fit inside your text box. There are two types of copy-fitting:
1. Shrink Copy to fit area - this will decrease the font size to make the text fit inside the text box if it is too long.
2. Grow Copy to fit area - this will increase the font size to make the text as large as it can be within the text box.
'Shrink copy to fit area' is turned on by default, but both of these settings can be toggled on and off using the toggles.
### QR Codes
QR codes can be inserted into any design by clicking on the QR code icon. When added to your design, you have four options to select from, Standard, Phone, Email and Tracked QR.
#### Standard QR
There are two options when defining a URL for the QR code. You can either choose a customisation that will use a URL stored within your data, or you can manually enter a URL using the text box field in the QR Code control sidebar. You can select the barcode colour along with the background colour and set a transparency for the background.
{% hint style="warning" %}
A word of warning: QR Codes will only scan when there is enough contrast between them and the background. Make sure that your QR code is sat on a white box or on a light colour background to ensure it will work as intended. A QR code must also be at least 2cmx2cm in size to scan successfully.
{% endhint %}
#### Phone QR
When selecting phone, you can either use a customisation found in your data or enter a fixed number. when this is scanned on a mobile device, that users phone will automatically start a call phone call to the number entered.
#### Email QR
When selecting email, once again, you can use customisations or enter the email address, subject and body text manually. When this is scanned, that user will automatically compile an email using the stating subject and body.
#### Tracked QR
If you select 'Tracked QR' from the drop down, you'll be shown a list of fields to populate, this will then create a UTM tracking URL for a Google Analytics campaign.
**Website URL** - the full website to direct your customers to (e.g.
**Campaign ID** - used to identify which adds campaign this referral references. Use **utm\_id** to identify a specific ads campaign.\
**Campaign Source** - use **utm\_source** to identify a search engine, newsletter name, or other source.\
**Campaign Medium** - use **utm\_medium** to identify a medium such as emails or cost-per-click\
**Campaign Name** - used for keyword analysis. Use **utm\_campaign** to identify a specific product promotion or strategic campaign\
**Campaign Term** - used for paid search. Use **utm\_term** to note the keywords for this ad.\
**Campaign Content** - used for A/B testing and content targeted ads. Use **utm\_content** to differentiate ads or links that point to the same URL.
#### Adding ZAP Insights to QR Codes
QR Code usage can be easily tracked using ZAP-POST. By turning on the 'Add ZAP Insights' toggle switch, you can measure how many scans you receive from your Zap submission.
When you have turned on ZAP Insights for QR codes, the scans will be recorded and grouped according to the submission the Zap was a part of. You can download a CSV of which recipients have scanned a QR code using the 'QR Code Tracking' download button in the furthest right column of the table on the Zap Processing screen.
#### Fonts
With ZAP-POST, you can upload custom fonts for use in your ZAP designs. To do so, you should first select the ‘fonts’ icon from the asset bar to navigate to the font management area. \
\
From here, you can upload fonts in either .ttf or .otf file formats. You can view, edit or remove their existing custom fonts. Any fonts uploaded will be available to use in the text editor tool.
## Background Colour
You can select a background colour for your design. On the right hand side under assets you will see an option called background. There are multiple ways you can choose your colour,\
\
RGB value \
HEX value\
HSV value
## Saving and loading designs
There are two reasons you will want to save your designs:
1. To be able to publish it to be the live design for your campaign
2. To use the design again in the future without having to start again from scratch.
Saving your designs is easy. Click ‘file’, then click on ‘save’. If you are saving your design for the first time, a window titled ‘your saved designs’ will launch. You will then need to give your design a name before hitting ‘save’ on the window. If you have already saved your design previously, then clicking save will overwrite the existing save with the design shown in the design area. If you want to change the name of the design or create a new copy, click ‘file’ and then click ‘save as’. Give your design a new name by filling in the bottom text box in the window, then click 'save'.
\
To open a previously saved design, click ‘file’ and then click ‘open’. This will launch the window of your saved designs where you can click on the design you wish to load into the panel. Once you have clicked the thumbnail of the design you want to load, click ‘choose’ to load it into the panel.
To make finding your saved designs easier, you can also create folders within the ‘your saved designs’ explorer.
Saved designs are specific to either the front or back of your Zaps, but can be used across multiple campaign types. If a saved design uses a variable that is not available in a different campaign type, you will be warned of this when you load the saved design into the new campaign. You will then need to change the variable before you can proceed to save or publish the design.
{% hint style="info" %}
If you are trying to load a saved design and are shown the warning notification, 'Some assets could not be loaded' then it is likely that the images used in the design have been deleted from your Static Image library. To fix this, either re-upload the asset into your library, or choose a different image to use.
- warning notification in Zap Designer.
{% endhint %}
#### AutoSave
The Auto Save feature ensures that your work is continuously saved after every change you make, providing a safety net against unexpected disruptions or crashes.
You have the flexibility to toggle the Auto Save feature on or off, based on your preference and workflow. To turn autosave on, click the toggle next to the save icon in the designer.
Autosave will be turned on by default when you create a campaign. If you have not yet saved a design for that campaign, then autosave will create a file for you. This file can be found in your saved designs folder in the Zap Designer accessed from the file dropdown menu.
## Proofing
Before you start sending out your campaign, you may wish to generate a proof to check that your design works how you intend it to. The proofing process will create a pdf using either your data or a sample set of data, which you can then download to your computer to check if it is up to standard.
### How to proof your designs
To begin the proofing process, click the proofing icon. This will take you to the first step of the proofing wizard. You can leave this wizard at any time by clicking the ‘back to content portal’ link at the top left.
The first step of the wizard requires you to select the saved design you wish to use for the front page of the proofing process.
You will do this for the front of your Zap, and then repeat the process on the next step for the back of your Zap.
\
\
If you need to go back and change your selected designs, you can do this by clicking ‘back’ in the bottom left corner of the screen.
With the designs for the proof chosen, you will now be presented with two options:
1. Use example data
2. Use your own data
If you choose to use the example data to generate your proof, any variable and address info in your designs will be completed using a predefined data set. This enables you to get a proof generated even if you don’t have any data yet ready to try your design with. The predefined data set consists of 20 example customers resulting in a pdf of 20 Zaps (front & back).
If you prefer utilising your own data to create your proof, simply upload a CSV file for your campaign through our user-friendly proofing wizard. Please note that the maximum limit for records on the uploaded CSV is 50. Once uploaded, we'll generate up to 50 Zaps for you, incorporating your design and data.
The final step of the wizard is to click ‘generate proof’ and then wait for your proof to be made.
Once it is ready, a download link will appear which you can click to download your Zap proof file and review the content.
## Publishing
In order to start uploading data to your campaign, you must first publish one of your saved designs.
{% hint style="warning" %}
The content must be published before the data!\
This is because we have to maintain a copy of the content as it was at the point the data was submitted. This allows the clients free reign to update their content whenever they want without disrupting the submissions they have already created with the intention of using the previous artwork. \
This has caused some confusion previously so it's an important note to be aware of.
{% endhint %}
### How to Publish your designs
To publish a design for a campaign, make sure the campaign you wish to publish for is selected within the designer. With the campaign selected, click the ‘publish’ button to show the publishing options:
1. **Publish** - clicking this will launch the publish wizard
2. **View published design** - clicking this will launch a pop up showing you what the current published design is for this campaign.
3. **Share published artwork** - clicking this will copy a link to your clipboard. Anyone who clicks this link will have pdf of the published design for this campaign downloaded to their machine.
**Publishing Wizard**
On the first screen of the wizard, choose the saved design you wish to publish for the front of your Zap campaign then click ‘next step’. On the following screen, choose the saved design you wish to publish for the back of your Zap campaign. With both sides of your Zap chosen, you will now need to create a proof which you will be required to sign off on in order to publish.
The proof generation process is exactly the same as the [proofing process. ](#proofing)
With the saved designs for the campaign chosen, you will now be presented with two options to generate the proof:
1. Use example data
2. Use your own data
If you choose to use the example data to generate your proof, any variable and address info in your designs will be completed using a predefined data set. This enables you to get a proof generated even if you don’t have any data yet ready to try your design with. The predefined data set consists of 20 example customers resulting in a pdf of 20 Zaps (front & back).
If you want to use your own data to generate your proof, you can do this by uploading a CSV for your campaign to the proofing wizard. We will generate up to 50 Zaps for you using your design and data. If you upload a CSV with more than 50 records, then we will take the first 50 records from the CSV and use those to create your proof.
\
The next step of the wizard is to click ‘generate proof’ and then wait for your proof to be made. Once it is ready, a download link will appear which you can click to download your Zap proof file.
After you have downloaded the proof file and checked it is all ok, you will be able to click ‘next’ and proceed to the final sign-off and publish page.
Here, you will see a summary of what you are publishing: the materials, the data source, the campaign you are publishing for, and the saved designs you are using. If you are happy with all of this, click ‘sign & publish’ to publish the designs for the campaign. You should now be taken back to the designer where you will see a notification to let you know your design has been published.
\
After publishing your designs, you are now ready to upload data to your campaign and start sending Zaps.
## Paper Stock Design File Download
You may download Adobe InDesign files for each of the Paper stock options. These are available in the designer and on the [Useful Resources Page](/zap-post-web-app/zap-post-user-guide/zap-app/using-the-zapp/design/useful-design-resources.md) in this documentation.
The InDesign files are designed to provide you with the creative guidelines to produce imagery and content for your Zap campaign. You can use these file to create designs in InDesign and export them into the Zap App or you can design your Zap directly inside the Zap App.
Important things to remember:
Add any variable text, or dynamic content like variable images or QR codes directly in the ZAP App, as opposed to saved into the images you export out of InDesign.
Best practices:
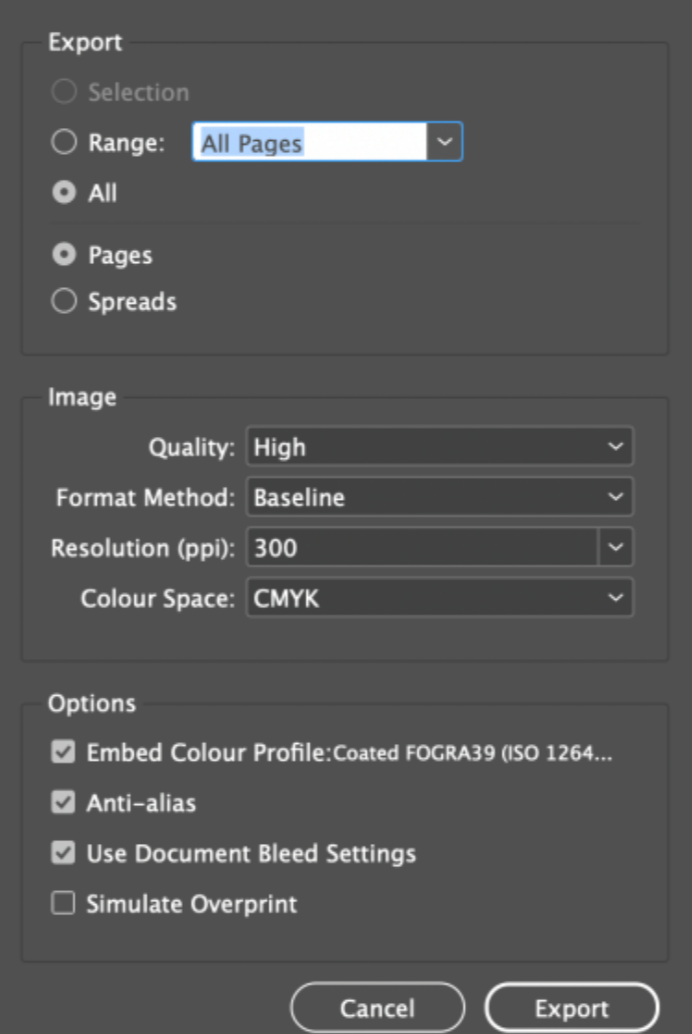
* 300dpi/ppi print resolution
* Images in CMYK colour space (not RGB) as .jpgs with no compression
* Ensure images extend to the red bleed line to allow for trimming.
* Keep important text or detail inside the safe zone, denoted by the red dashed line
* When exporting jpg images from our templates, use settings as shown: (Note - ‘Use Document Bleed Settings is ticked on)
InDesign Export Settings
---
# Agent Instructions
This documentation is published with GitBook. GitBook is the documentation platform designed so that both humans and AI agents can read, navigate, and reason over technical content effectively. Learn more at gitbook.com.
## Querying This Documentation
If you need additional information that is not directly available in this page, you can query the documentation by asking a question.
Perform an HTTP GET request on the following URL with the `ask` and `goal` query parameters:
```
GET https://userguide.zappost.com/zap-post-web-app/zap-post-user-guide/zap-app/using-the-zapp/design.md?ask=&goal=
```
`ask` is the immediate question: it should be specific, self-contained, and written in natural language.
`goal` is what the user is ultimately trying to achieve, the reason they need the answer. Sharing it helps GitBook give you a better, more relevant answer. A goal is most helpful when it describes the outcome the user wants rather than restating the question. For example, with `ask=how do I create an API token`, a goal like `automate deployments from our CI pipeline` lets GitBook tailor the answer to that use case.
The response will contain a direct answer to the question and relevant excerpts and sources from the documentation.
Use this mechanism when the answer is not explicitly present in the current page, you need clarification or additional context, or you want to retrieve related documentation sections.


 - warning notification in Zap Designer.
{% endhint %}
#### AutoSave
The Auto Save feature ensures that your work is continuously saved after every change you make, providing a safety net against unexpected disruptions or crashes.
You have the flexibility to toggle the Auto Save feature on or off, based on your preference and workflow. To turn autosave on, click the toggle next to the save icon in the designer.
- warning notification in Zap Designer.
{% endhint %}
#### AutoSave
The Auto Save feature ensures that your work is continuously saved after every change you make, providing a safety net against unexpected disruptions or crashes.
You have the flexibility to toggle the Auto Save feature on or off, based on your preference and workflow. To turn autosave on, click the toggle next to the save icon in the designer.