> For the complete documentation index, see [llms.txt](https://userguide.zappost.com/llms.txt). Markdown versions of documentation pages are available by appending `.md` to page URLs; this page is available as [Markdown](https://userguide.zappost.com/zap-integrations/zap-post-integrations/bloomreach/pushing-data-to-zap-post-with-bloomreach-scenarios.md).
# Pushing Data to ZAP-POST with Bloomreach Scenarios
Bloomreach Engagement can integrate with ZAP-POST. This guide explains how to set up the integration with ZAP-POST and provides two use cases as examples of how to use ZAP-POST with Bloomreach Engagement.
### Setup process
You'll need to create ZAP-POST API credentials. API credentials allow authentication for incoming webhook requests.
To create an API key:
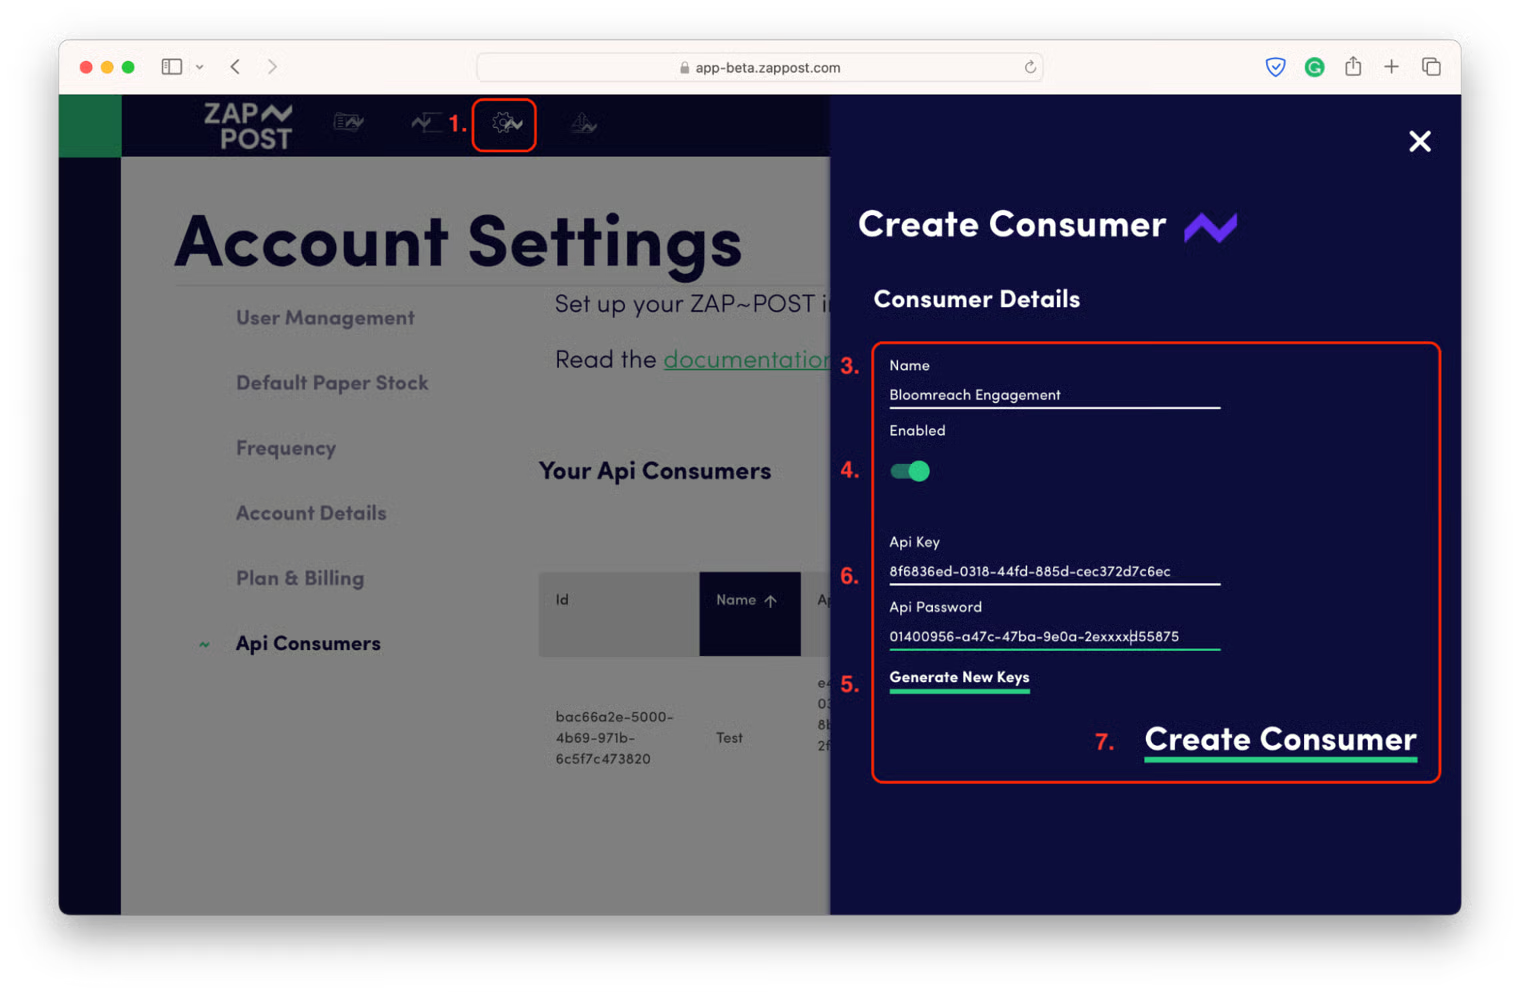
1. In the ZAP-POST app, click `Settings` > `Api Consumers`.
2. Click `Add New Consumer`.
3. Fill in the `Consumer Name` field with a name you want it to have.
4. Make sure you **Enable** the Consumer.
5. Click `Generate New Keys`.
6. Copy the key and password and store them safely for later use.
7. Finish by clicking `Create Consumer`.
### Configure webhook authentication
In Bloomreach Engagement, configure the [webhook authentication](https://documentation.bloomreach.com/engagement/docs/webhooks#http-authentication-schemas) for ZAP-POST so that data can be passed securely in the webhook request. You will use this webhook authentication while creating a scenario in a later step.
To configure webhook authentication:
1. In Bloomreach Engagement, open `Data & Assets` > `Integrations`.
2. Click `Add new integration` > `HTTP Authentication Schemas` > `Add integration`.
3. Edit the name of the Integration - so anyone knows it is for your ZAP-POST account.
4. In `Endpoint`, enter the ZAP-POST API base URL:\
`https://api.zappost.com`
5. Make sure you select the `Basic Authentication` method.
6. Enter the following:\
`Username`:\
The Api Key from ZAP-POST created in the Setup process\
`Password`:\
The Api Password from ZAP-POST created in the Setup process.
Test the integration - when it is all setup properly, the authentication will be successful.
Go ahead and click: `Save integration`.
**Use case**
In Bloomreach, we provide an Action webhook preset option for working with ZAP-POST. This preset is available for an endpoint: `/api/v1/records` - **ZAP-POST Individual Post preset**.
Imagine you're running an online store, and sometimes customers put items in their shopping cart but don't complete their purchase. When this happens, you may want to let ZAP-POST know about these abandoned carts so personalized messages can be mailed to customers. You can use the **ZAP-POST Individual Post** preset for this.
However, it's important to understand that this is physical mail, ZAP-POST doesn't send each one individually right away. Instead, ZAP-POST waits until the end of the day and then sends them all together as a single batch. This helps keep things organized and makes it easier to keep track of what's going on. So, if you're looking for updates in your ZAP-POST account on these abandoned carts, you'll need to wait until the day after you've reported them when they've been grouped together.
In a nutshell, the **ZAP-POST Individual Post** preset is for individual pieces of information.
#### Example
In your [scenario](https://documentation.bloomreach.com/engagement/docs/scenarios-1), you can use a combination of [operators](https://documentation.bloomreach.com/engagement/docs/scenarios-1#operators) and [actions](https://documentation.bloomreach.com/engagement/docs/scenarios-1#actions) to send zaps using ZAP\~POST to relevant users based on custom conditions.
When using the **ZAP-POST Individual Post** action, you can also catch error responses returned by this Action node and update your account data or notify your team to check the address of customer, or notify the customer via other channels - email & sms - to update their postal address. You should also remove invalid addresses from future submissions - either via consent revocation or adding a flag to the customer record signifying the postal address is not valid until corrected.
**Prerequisites**
* ZAP-POST
* You understand the only parameter required by the [Submissions API endpoints](https://documentationhub.zappost.com/v/zap-post-api-documentation/api-endpoints/submissions), which is a valid campaign ID.
* Bloomreach Engagement
* You know your audience and scenario execution requirements.
* You have collected and are storing relevant customer properties, e.g. postal address, in the [Data Manager](https://documentation.bloomreach.com/engagement/docs/data-manager).
**Create a scenario**
Let's create [a scenario](https://documentation.bloomreach.com/engagement/docs/scenarios-1) to automate the communication with your users based on custom conditions.
Specifically, you will use [an action](https://documentation.bloomreach.com/engagement/docs/scenarios-1#actions) to send a webhook request to ZAP-POST to send a Zap. For that you will use webhook presets that are created specifically the Bloomreach integration with ZAP-POST.
{% hint style="info" %}
📘 Your scenario path may vary from the following steps depending on the actions you decide to implement and the dynamic data you choose to include in your user communication. See [Personalization Using Jinja](https://documentation.bloomreach.com/engagement/docs/personalization-using-jinja).
{% endhint %}
To create a scenario in Bloomreach Engagement:
1. In Bloomreach Engagement, open `Campaigns` > `Scenarios` > `Create new`.
2. (Optional) Click the edit symbol in the scenario name to change it.
3. Create and configure the [triggers](https://documentation.bloomreach.com/engagement/docs/scenarios-1#triggers) and [operators](https://documentation.bloomreach.com/engagement/docs/scenarios-1#operators) that best suit your campaign needs.
4. Create [an action](https://documentation.bloomreach.com/engagement/docs/scenarios-1#actions) with the webhook request to ZAP-POST.
* [ ] In `Scenario` select `Other` > `ZAP~POST Individual Post`.
* [ ] In the `Settings` tab of the action:
1. Enable `Authentication` and select the authentication you created.
2. In `Other`, select the required [consent category](https://documentation.bloomreach.com/engagement/docs/consent-categories) for your users.
* [ ] In the `Parameters` tab of the action fill in the parameters. In this example, the Campaign ID looks like `46761c11-ec52-ee11-9937-6045bdd0c438`. This parameter is required and can be found in the URL on the Campaign Edit page in ZAP-POST.
Click `Campaigns` → `Edit Zap design` to find the Campaign ID in the URL.
Get the Campaign ID from ZAP-POST
\
The webhook will be sent even with only Campaign ID and will return code 200, which signals success. However, there will be no information sent to the campaign. You need to customize the customer properties category. There are mandatory properties like, for example, Customer ID and not mandatory, for example, Address 3. Read tooltips by hovering with a cursor over the 'i' and refer to the [Submissions endpoint reference](https://documentationhub.zappost.com/v/zap-post-api-documentation/api-endpoints/submissions#useful-information).
5.
```
After an abandoned cart for a day, you can send a zap to all people who didn't complete their purchase in a day. For that, we will use the "ZAP\~POST Individual Post" preset.
```
1. Make sure you customize customer properties because otherwise, no data will be sent in both examples. You can either modify values in the parameters tab or directly modify JSON.\
Customer properties that are required:
* [ ] `CustomerId` - Must be unique
* [ ] `Firstname` - Must be alphanumeric, space, -, (, ), full-stop and ' only.
* [ ] `Surname` - Must be alphanumeric, space, -, (, ), full-stop and ' only.
* [ ] `Address1` - Must contain alphanumeric, space, ', ., &, -, /, \\, ), ( and , characters only.
* [ ] `Postcode` - Must be alphanumeric, - and spaces only.
* [ ] `Country` - Must contain letters, space, -, (, ), full-stop, & and ' only.
For more information visit the [ZAP POST Documentation](https://documentationhub.zappost.com/v/zap-post-api-documentation/api-endpoints/submissions#useful-information).
Click `Save`.
### Submissions endpoint
ZAP-POST also provides an `/api/v1/submissions` endpoint, which does almost the same thing as the `/api/v1/records` endpoint.
Suppose you want to send a list of reminders for customers whose subscriptions expire soon or a reactivation campaign for customers who last purchased a while ago. You'd use the `/api/v1/submissions` endpoint in that case.
In a nutshell, the `/api/v1/records` endpoint is for individual pieces of information, like abandoned shopping carts, while the `/api/v1/submissions` endpoint is for sending collections of related information, like lists of reminders or lapsed customers.
If you want to use the `/api/v1/submissions` endpoint, use the **ZAP-POST Individual Post** preset and modify it as shown below.
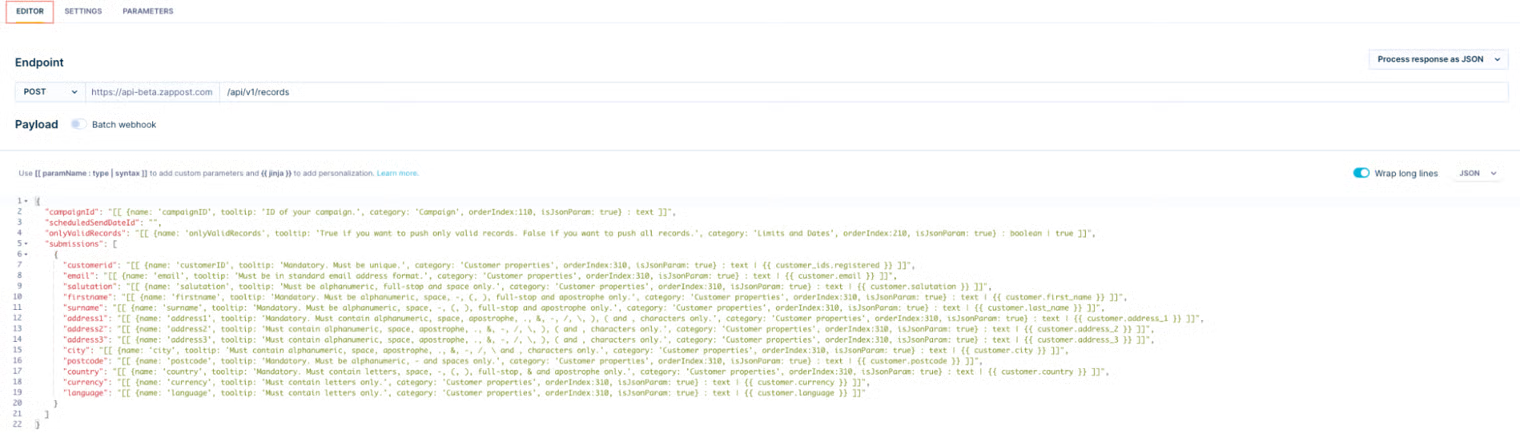
This is an editor part of the "ZAP-POST Individual Post":
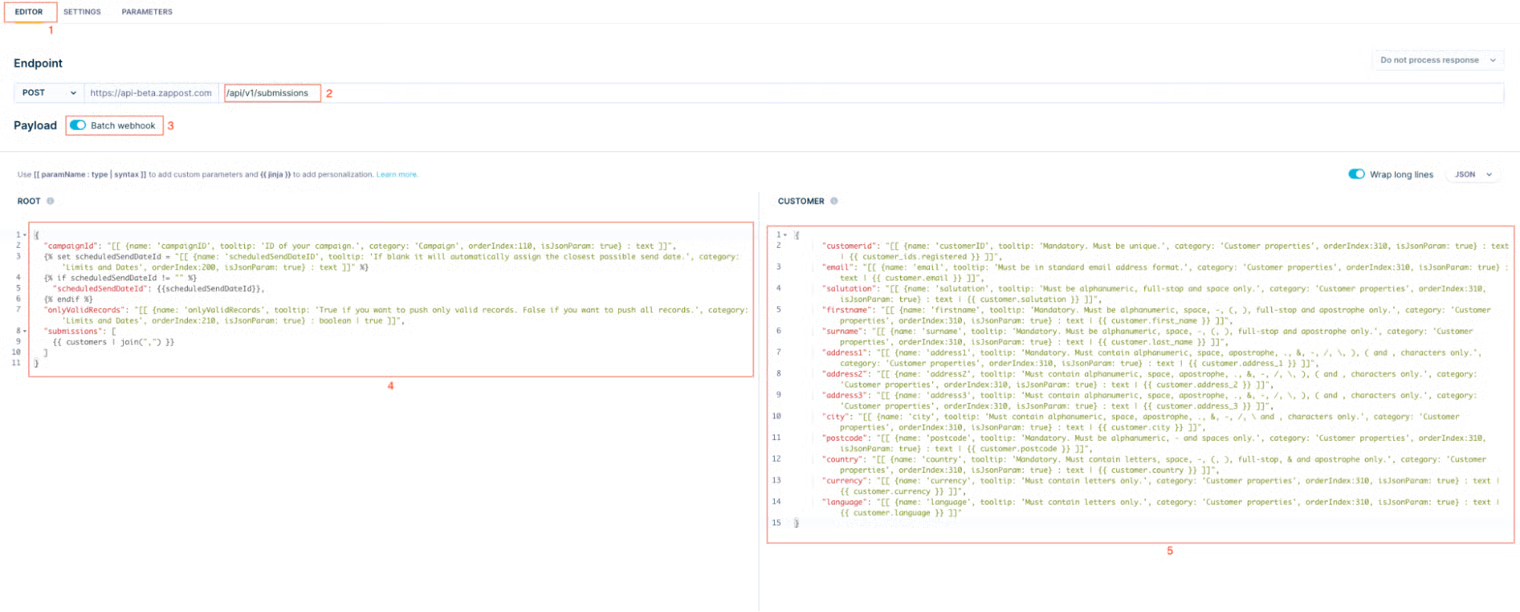
This is how it should be changed:
1. Click on the `Editor` tab.
2. Change `Endpoint` into `/api/v1/submissions`.
3. Click on the `Batch webhook` button and then on the `Turn on and reset template`.
4. Copy and paste everything from the original `Payload` to the `Root` part and then change the inside of the "submissions" in the square brackets to:\
`{{ customers | join(",") }}`
5. Copy and paste the inside of the original "submissions" without the square brackets into the `Customer` part
**Next steps**
Before you launch your scenario, you can test and preview the complete workflow in the `Test` tab. When you click `Start`, you will see a confirmation window indicating how many customers will be affected by the scenario run.Set the frequency of data collection.
* Map to ZAP\~POST Campaign.
* Map any custom fields you have set up in the ZAP\~POST Campaign.
* Bloomreach Contacts are updated to record recipients who have/have not received a ZAP.
* Any returns (undeliverables) are updated on Bloomreach on a daily basis.
{% hint style="info" %}
Integration to Bloomreach Engagement can be self-service but if you need any help, ZAP\~POST support will assist and manage the setup where required, at no additional cost. Start a web chat from within the app, or send an email to
{% endhint %}
---
# Agent Instructions
This documentation is published with GitBook. GitBook is the documentation platform designed so that both humans and AI agents can read, navigate, and reason over technical content effectively. Learn more at gitbook.com.
## Querying This Documentation
If you need additional information that is not directly available in this page, you can query the documentation by asking a question.
Perform an HTTP GET request on the following URL with the `ask` and `goal` query parameters:
```
GET https://userguide.zappost.com/zap-integrations/zap-post-integrations/bloomreach/pushing-data-to-zap-post-with-bloomreach-scenarios.md?ask=&goal=
```
`ask` is the immediate question: it should be specific, self-contained, and written in natural language.
`goal` is what the user is ultimately trying to achieve, the reason they need the answer. Sharing it helps GitBook give you a better, more relevant answer. A goal is most helpful when it describes the outcome the user wants rather than restating the question. For example, with `ask=how do I create an API token`, a goal like `automate deployments from our CI pipeline` lets GitBook tailor the answer to that use case.
The response will contain a direct answer to the question and relevant excerpts and sources from the documentation.
Use this mechanism when the answer is not explicitly present in the current page, you need clarification or additional context, or you want to retrieve related documentation sections.